Support
 How to Check if my PC Supports Secure Boot
General Interest
Information in this article applies to:
- uScope Navigator V4.0 — uScope Navigator V4.3
Article ID: NGN1163 — Created: 10 Mar 2018 — Reviewed: 22 Nov 2019
Question
What is Secure Boot and how can I check my computer to know if it is supported?
Answer
Recent desktop and laptop PCs include a feature called Secure Boot. It is a setting you can change in your computer’s BIOS that increases the security of PCs running Windows by requiring that bootable software include a valid certificate that identifies the developer (Microsoft in this case).
Secure Boot was introduced at the time of Windows 8. It was originally designed as a security measure to lock down the computer and prevent it from booting into anything but Windows 8 (or Windows 10). Starting in Windows 10 version 1607, Microsoft added new requirements for kernel mode drivers (which are used by the uScope USB interface) that place additional restrictions on how the drivers are signed.
Note
You may need to disable the Secure Boot setting to install and run uScope device drivers when using uScope Navigator v4.0-v4.3. uScope Navigator v4.5 is compatible with Secure Boot and does not require it to be disabled.
To find out if your computer supports Secure Boot...
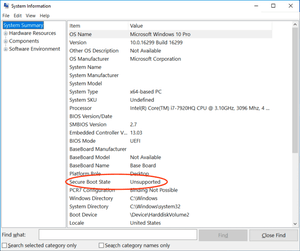
 You can use the System Information Utility (MsInfo32.exe) to determine if Secure Boot is supported by your computer and if it is enabled or disabled.
- From the start menu, enter "msinfo32.exe".
- Select MsInfo32 from the list of programs and press Enter to launch it.
- On the System Information window, make sure that System Summary is selected from the left side menu.
- You should see a section titled Secure Boot State. If this setting is not listed, your operating system does not support Secure Boot.
- The Secure Boot State can have one of three values:

Secure Boot Unsupported
This setting indicates that your PC hardware does not support Secure Boot. So, the elevated requirements for boot programs and drivers are not enforced by the Windows operating system.

Secure Boot On
This setting indicates that your PC hardware supports Secure Boot and that the Secure Boot BIOS setting is Enabled.

Secure Boot Off
This setting indicates that your PC hardware supports Secure Boot but the Secure Boot BIOS setting is Disabled.
To disable Secure Boot on your PC...
There are several reasons why you may need to disable Secure Boot:
- Performing PC maintenance procedures such as BIOS or firmware updates that must boot from a USB thumb drive.
- Running system repair utilities.
- Installing another operating system like Linux.
- Installing an older version of Windows.
- Avoiding Windows 10 restrictions on kernel mode drivers.
As of uScope Navigator v4.3 (and earlier), uScope Drivers are not signed in accordance with Microsoft's restrictions when Secure Boot is enabled. So, if you have a desktop or laptop that supports Secure Boot, you must disable it if you wish to use the uScope with that PC.
Entering the BIOS Settings
Secure Boot is one of your PC's BIOS settings. You must restart your computer to change it.
When your PC boots (or reboots) it displays a manufacturer screen. At this point, you have the option of pressing a key to enter the BIOS setup. Typically, you will see a message appear on the screen telling you what key to press. This key changes from PC to PC. Sometimes, the message on your computer screen that says what key to press may be incorrect. The most common keys are F1, F2, DEL, or F12.
The BIOS Settings Screen
The BIOS settings screen presents you with options and parameters that can be configured for your PC. You are looking for the Secure Boot setting which is usually found on the second or third page of options (the Boot, Security, or Authentication page of settings). You must change the Secure Boot setting to Off or Disabled.
The following images show several different manufacturers BIOS screens where the Secure Boot setting is available:

Acer BIOS Settings

ASRock BIOS Settings

ASUS BIOS Settings

HP BIOS Settings
Once you have found the Secure Boot setting, change it to Off or Disabled.
In order for changes to the Secure Boot setting to take effect, you must save the BIOS settings before you exit the BIOS screen. The most common key to save and exit is F10.
After your PC reboots and loads Windows, you can confirm that Secure Boot is disabled (or enabled) by using the MsInfo32.exe utility shown above.
For more information, you may wish to reference a Microsoft Knowledge Base Article for more information about Secure Boot.
Note
If you disabled Secure Boot because your uScope driver would not install, confirm that Secure Boot is disabled. Then, refer to Manually Installing Drivers for more information about reinstalling the uScope drivers.
The driver included with uScope Navigator v4.5 is compatible with Secure Boot and does not require it to be disabled.
Related Articles
- uScope Driver Will Not Install
Installation - Verifying uScope Drivers Are Properly Installed
General Interest