Support
 Changing the Filter Used for Scanning
Scan Mode
Information in this article applies to:
- uScope Navigator (All Versions)
Article ID: NSC1029 — Created: 4 Apr 2017 — Reviewed: 5 Feb 2018
Question
How do I change the filter used when I scan a region of interest?
Answer
There are actually three different places where you may change the filter used for scanning.
- You may change the filter when you select the region (or regions) of interest.
- You may change the filter when you set focus and illumination for a region of interest.
- You may change the default filter used in the Device Settings dialog.
Changing the Filter when Selecting the Region(s) of Interest
 When you have loaded a slide and selected the region of interest, you may set the focus method and filter to use.
The filter drop down contains a list of all filters that are available. Select the filter you want to use for the scan.
At this point, only the overview image displays. So, the effects of the selected filter are not obvious.
Selecting the filter when you adjust the focus and illumination settings may be easier since the objective image is displayed with focus, illumination, and filter settings.
Changing the Filter when Setting Illumination and Focus
 After you have selected a region of interest and clicked the Start Scan button, you are presented with the focus screen where you may set the illumination and initial focus for the scan. On this screen, you may also change the filter used for the scan.
The filter drop down contains a list of all filters that are available. Select the filter you want to use for the scan.
The effects of the selected filter are applied to the live objective image that is displayed.
This may be the best place to select or change the filter since you can immediately see the effects of each filter.
Changing the Default Filter to use for Scanning
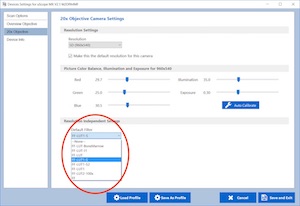 The default filter may be changed on the Device Settings Dialog for each uScope.
To begin...
- Click the Device Settings button from the uScope Control Panel.
- Select the Objective tab.
- Click the Default Filter drop down to select your preferred filter sequence.
- Be sure to click the Save and Exit button in the bottom right corner of the dialog to save your changes.