Support
 Recreate EDF Images After Changing Options
Whole Scan Images
Information in this article applies to:
- uScope Navigator V4.5 and Later
Article ID: NWS2320 — Created: 1 Sep 2020 — Reviewed: 6 Sep 2020
Summary
uScope Navigator v4.5 introduced the ability to create EDF (Extended Depth of Field) images from a multi-layer scan or z-stack. Several options are used by the EDF image processor when creating the composite EDF images. If you change these options, you may need to re-generate the EDF field images and re-create a Deep Zoom or other Whole Scan Image.
Details
The job folder for a multi-region scan appears as follows:
C:\Images
      Multi-Layer-JobName
         JobInfo.xml
         uS-Overview.jpg
         uS-Key.jpg
         uS-ScanInfo.xml
         uS-XxxxYyyyZzz.(jpg|png)
         EDF (folder containing EDF field images)
            uS-ScanInfo.xml
            DZCombine.xml
            uS-XxxxYyyy.jpg
         Deepzoom-unfiltered
            DZDirInfo.xml
            MIDZ.html
            EDF (folder containing EDF Deep Zoom images)
               MIDZ.html
               uS-Overview.jpg
               uS-Key.jpg
               DZThumbnail.jpg
               DZThumbnail_sq.jpg
               DZInfo.xml
               DZViewer.xml
               DZOutput.xml
               DZOutput_files
                  (Deep Zoom Pyramid Files)
            Layer01
               (same as EDF above)
            Layer02
               (same as EDF above)
         EasyZoom
            (EasyZoom (SZI) Images)
         SVS
            (SVS Images)
         Exports
            (Deep Zoom Exported ROI Images)
Note
We strongly suggest that you make a backup of the job folder before making changes to its contents.
To Re-Generate EDF Image Fields...
 If an EDF folder containing the EDF Field Images already exists, when you click the Create Whole Scan Image button in uScope Navigator and opt to create the EDF layer, you are presented with an Overwrite Confirmation dialog for the EDF Field Images.
- Select Overwrite to erase and re-create the EDF field images. This will erase and re-create the EDF folder (shown above in red).
- Select Use Existing to keep the previous EDF field images.
Alternatively, you could use Windows Explorer to delete the EDF folder (shown above in red) manually.
To Re-Create the Deep Zoom Image...
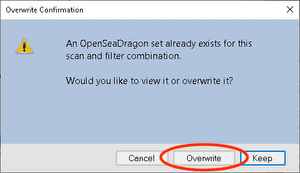 If an EDF Deep Zoom folder already exists, when you click the Create Whole Scan Image button and opt to create the EDF layer, you are presented with an Overwrite Confirmation dialog for the EDF Deep Zoom image.
- Select Overwrite to erase and re-create the EDF Deep Zoom image. This will erase and re-create the EDF folder (shown above in blue).
- Select Keep to keep the previous EDF Deep Zoom image.
Alternatively, you could use Windows Explorer to delete the EDF folder (shown above in blue) manually.
Related Articles
- Poor Stitching on All Scans
Whole Scan Images - Images for Scan Columns 1 & 2 Do Not Overlap Correctly
Scan Mode - What are Tiled TIFF (SVS) Files?
Whole Scan Images